Wednesday, June 29, 2011

Find the Cure

I'm back with a project for the Cricut Circle Blog and the monthly challenge.


JUNE MONTHLY CHALLENGE: On the Road Again Challenge!

For a lot of us summertime means ROAD TRIP! For this challenge, we want you to create something . . . ANYTHING for your car! It can be a travel game, travel activity, organizer, whatever! Let your imagination run wild.


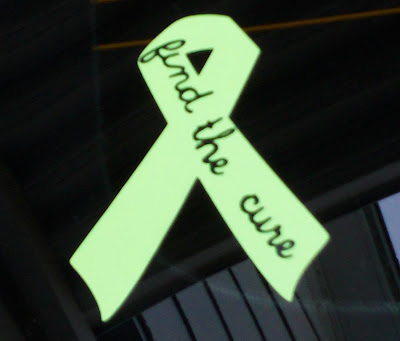
This summer we've had lots of road trips but not the fun kind where you get to go to a luxurious hotel or see the sights. Instead our summer road trips are my husband and I traveling an hour each way going to chemotherapy so I decided to make an awareness ribbon for my car.


Pink ribbons are well known for breast cancer but I had to look up the colors for lymphoma which to my surprise turned out to be cricut (lime) green. The colors don't show well in the photo because of the time of day I took the picture. Hopefully my little ribbon will grow awareness for this cancer that affects so many but yet is so unknown.


I used the ribbon from Pink Journey and cut it from cricut green vinyl. Then I took the phrase 'for the cure' from the same cart and cut from black vinyl. I used my gypsy to weld the word 'find' together from the Designer Calendar cart so I could switch it out for the word for. You gotta love the gypsy!!

I hope you enjoy my little project for our summer road trips and don't forget to click on the LLS link to find out more about lymphoma and how you can help find a cure.

Hugz
tina gale


Tuesday, June 21, 2011

You & Me

Hello all,  I'm thrilled to be back again with a layout for the sweet sassy diva design team. This week my challenge was to work with the Graphically Speaking cart. I love this cartridge and have used it a lot for my sons photos. It has some great phrases and cuts for teenage boys! I decided to challenge myself and use it for something other than guy stuff and I'm so happy with what I came up with. I bet most would never guess I used GS for this layout at first glance. 

These photos were taken at our church on Valentines Day weekend by friends. We had a fabulous service about marriage and then everyone renewed their wedding vows and had wedding cake after the service. It was such a great time.
I have to tell you about the huge cakes in the background as well. I've donated a cricut to our church's decorating department and all the flowers on the cake was made with it. Remember you can always click on the photos to enlarge them and get a better look. I think they did a fabulous job with their cricut and the George cart!!
A close up of the title. Together did not have a shadow but I needed it to pop off the page so I glued it to a piece of cardstock and then just trimmed around it real quick. I also pop dotted it off the page.
 The border is made from 2 1/2" squares of patterned paper matted with cardstock. I had these fabulous embellishments in my stash that I used to add some bling to the page.
I added yellow rhinestones to the antenna to help make the butterfly pop and pop dotted it off the page. I also added a tiny pink heart to the end of the swirl.
This is the first time I can remember that I did not pen and ink up my cuts but I think it works for this layout.

The sizes of all the cuts are as follows.
me & you - 2"
Together - 3/4"
flower border - pg. 33   1 3/4"
butterfly - pg. 57    2 3/4"

I hope you enjoyed my layout today and stop by my blog to see more wonderful projects.
Hugz
Tina Gale

Monday, June 20, 2011

H2O

Well I'm back with the final two beach layouts. I hope you've enjoyed my quick layouts here lately and are inspired to scrap even when life gets in the way.
This is still yet another kit from TLC. I love their papers! It's such a shame they didn't make it as a business. I cut the little mermaid from LAB and blinged her up with a green jewel for her hair. The flower is really a starfish but I cut two of them out of burgandy paper and layered them for a flower.
I cut some various seaweed from LAB and used around the photos to tie the layout together.

The second page I really didn't do much to. I added some coral, shove, and seaweed along with some more word stickers. The journalling block is an embellishment from the paper kit.


Recipe:
Mermaid 3 1/2" - Life's a Beach
Seaweed 3" - Life's a Beach
Coral 2" - Life's a Beach
Shovel 2" - Life's a Beach
Page Kit from TLC
Various word stickers from Hobby Lobby

Thanks for joining me again today!
Hugz
Tina Gale

Saturday, June 18, 2011

Gettin Wet and a little personal update

Hello all! I know I promised these layouts a few weeks back but it just seems like life always gets in the way. I usually don't share a lot of personal stuff on my blog because originally I only blogged for me so I could go back and see I was accomplishing something. I never dreamed I would make so many friends or have people that wanted to follow me and my work. My blog has grown into a great network of women that inspire me and hopefully I can do the same sometimes.  I appreciate all of you that come to my blog and share your comments and friendship with me. So just a little update as to where I've been. My hubby has been ill for a couple of months and no one could diagnose what was wrong. We have spent a lot of days at various Dr's appts and two stays at the hospital. On May 25th we finally got the diagnosis that he has lymphoma. It was a great shock to both of us because he is so incredibly healthy and active. He has started chemotherapy and we still spend a lot of time at the Dr's but it's getting better and more of a routine so life is becoming a little more predictable. I have already received so much support and prayers from many of you that I chat with on the cricut message board and it means the world to me. We continue to ask you to keep us in your prayers and thoughts as we continue through treatment. One of the great shocks was to learn there is no cure for lymphoma but it can be managed very well through chemo. As I learn more about this journey we are taking I will be talking about it more on my blog to raise awareness of lymphoma and the many people that live with it. It is unthinkable in the world of science and technology we live in today that there are so many unknowns for this disease. I hope you'll join me in raising awareness of this disease and supporting the Leukemia & Lymphoma Association for finding a cure.

Now onto a brighter note. Here's another layout to go with the California Dreamin one I posted a couple of weeks ago. It's really a simple one and not a lot of cricut but enough to give the page that something extra.
The title gettin wet and papers are more from my TLC days of selling their product. They're no longer in business but they had fabulous paper and kits.
I added some cuts from cricut and Life's a Beach and had a really quick layout that's cute even if I do say so myself.

Recipe:
Fish 1 3/4 - Life's a Beach
Umbrella 3 1/2" - Life's a Beach
Various word stickers from Hobby Lobby
Paper Kit from TLC

I hope you enjoyed seeing another of my quick beach layouts. I have a couple more I'll be posting soon.
Hugz
tina gale

Thursday, June 9, 2011

Senior Photo Shoot

Hi everyone!   I have a great layout to share today of my sons senior pics and a video showing how to use the  Imagine when you don't have just the right paper for a project. It's really hard to video the small screen so I apologize it's a little blurry but hopefully it will help you learn a great feature of the Imagine. I can't wait to share with you how easy it is!


 Here's a close up of the banner I made with my Imagine.  It's cut from the Imagine More cartridge pg. 27 at 1.7 inches. I changed to the patterned paper found on pg. 44. Be sure to check out the video to learn how to do this. It's super simple and fabulous way to save money on patterned paper!

I used bakers twine and buttons to hang it on my page. Their school colors are burgandy, gold, and black so I chose the black and yellow twine and burgandy buttons to tie in their colors.
 The font is from the Old West cart cut at 3/4 inch. I used an extra pennant to put the year on.
 I decided upon argyle paper and the diamond border to complement the banner.
The border is cut at 2 inches from the Creative Memories Reminisce Accents cart pg. 65. This cart has some fabulous borders on it! I cut two of them and pieced together on my layout. You could also weld them on your gypsy or in the cricut craft room before cutting.
I used the negative pieces from the border to put across the middle of the page to help carry through the design. Don't be too quick to throw your trash away! You never know when it can be a great addition to your project.
I hope you enjoyed my layout and video and that it helps you try this great feature if you haven't already.

If you're reading this from sweetsassydiva be sure to come visit me at my blog for more great projects and if you're reading this at my blog be sure to visit sweetsassydiva for more great graduation projects from the rest of the design team.

Have a blessed Day
Tina Gale