Tuesday, March 25, 2014

Guest Designer - CTMH Laughing Lola


Today I have a gorgeous layout created by a friend of mine, Nancy. She was inspired by a layout Debbie from Scrapbook Generation created. I've seen the original layout and I would have never dreamed of using Laughing Lola on it. Nancy did a fabulous job! Her granddaughter is of course the perfect subject!


I'd like to thank Nancy for letting me share her layout with you all. I hope it inspires you to try this sunburst technique. It can take some time but it is so worth it!

Supplies used
CTMH Laughing Lola B&T Duos paper X7170B
CTMH Laughing Lola Complements Dimensional Elements X7170C
CTMH Laughing Lola Assortment Z1854


March CTMH Specials


 If you don't do digital layouts check out the fabulous new photo well feature to print out your photos. This is great for those odd sized photos or for the new pocket page protectors.


 Stamp of the Month


$5 with your $50 purchase
or $17.95

Hugz
Tina Gale

Monday, March 24, 2014

FREE CTMH Cricut Cartridges

If you haven't gotten all of the CTMH Cricut collections have I got a deal for you. In the month of April every new consultant will receive their choice of one of the collections for FREE!! That's right you choose between Art Philosophy, Artiste, or Artbooking when purchasing your consultant kit.
Only $99 
and valued at $350


 Z1686 Cricut® Art Philosophy Collection
 Z1790 Cricut® Artiste Collection
Z1906 Cricut® Artbooking Collection 


You can also get your new Consultant kit for FREE!! What?! You read right. Your consultant kit valued at $350 dollars is a great deal at only $99 but when you work your new business and reach your Straight To the Top promotion by submitting $1200 in sales your first 3 months CTMH will refund you the cost of your kit. How exciting is that? That's over $450 of CTMH product for FREE not to mention the product credit and commission you will be earning.

If you've thought about signing up April is the month. REad  all the info. Contact me with any questions and we'll get you ready to sign April 1st.

Check out all the FAQ here       CTMH Consultant FAQ 

Organizing Challenge for new Studio

I'm sorry I've been missing. I got a wild idea about moving my studio so I've been packing and moving for over a week now. I'm beginning to see a light at the end of the tunnel. I have most of my furniture set up.

If you'd like to win a stamp set I have a little contest going on over on my Facebook page. Hop over there to leave your best organizing tip for me to be entered to win. If you don't do facebook you can leave your tips here.


A few pics of my space before


And the view from my desk. I'll miss this most of all!


A peek at the mess as we moved it all downstairs.


My hubby was fantastic! He kept moving it around until I was happy. The downside of being such a visual. LOL He's definitely a keeper!!


And a peek of what's lookin good so far. Hubby still needs to build a corner shelf to tie the cabinets together and 3x3 cube will go on top of it.


 I still have my office space to set up and all those misc baskets that you never know what to do with as well as my workstation. I'll share pics as I finish up.

I'm working on a box of die cuts right now. You know those leftover from your cricut/silhouette cuts that didn't quite work out. I'd love to hear your best tips on organizing these so i'll use them or else I'm going to have to just part ways with them for now.

Hugz
Tina Gale

Wednesday, March 12, 2014

Epcot - America

We can't forget the good ole US of A on our trip around the world although I have to say it's one of the least exciting places to visit in Epcot. We love to eat around the world and all we have is hot dogs and funnel cakes. What's up with that? LOL I do love watching them bring the flag out though that's quite the site.


Have a Tiggerific Tuesday!
Hugz
TinaGale


Tuesday, March 11, 2014

Smile and Say Mickey

Today I'm sharing a layout I did a little ways back but haven't shared yet. These pics are of my sons first Disney internship. We had a little get together with friends to wish him farewell on his big adventure.


Sorry the photo is so light. you can always click on the photos for a closer look if you're interested. I used a lot of leftover stash for this layout along with some new papers at the time. I love how it all mesh together.


March CTMH Specials


 If you don't do digital layouts check out the fabulous new photo well feature to print out your photos. This is great for those odd sized photos or for the new pocket page protectors.  Check out this tutorial to print photos.


 Stamp of the Month


$5 with your $50 purchase
or $17.95


Hugz
Tina Gale

Tuesday, March 4, 2014

Lollydoodle Weekend to Remember

Here is my 2nd layout for the Scrapology  weekend. I had lots of photos and this was a great way to get them all in there. I'll be adding a title across the banner once I finally make up my mind which one.


Supplies
Lollydoodle stamp set from the Workshop on the Go
Cotton Candy Ink Pad


March CTMH Specials


 If you don't do digital layouts check out the fabulous new photo well feature to print out your photos. This is great for those odd sized photos or for the new pocket page protectors.


 Stamp of the Month


$5 with your $50 purchase
or $17.95


Monday, March 3, 2014

Always Wear Your Crown - Scrapbook Generation Blog Hop


Scrapbook Generation Blog Hop

Welcome to the Scrapbook Generation Blog Hop for March, if this is your first stop, you might like to start at the Scrapbook Generation blog and then hop through each link.

I'm sharing one of the layouts I did documenting a recent crop I attended with a bunch of online friends including Debbie, Stacey, and Allison. It was an amazing time and so much fun. I used the new Lollydoodle paper pack and embellishments from Close to my Heart. It was perfect for this momentous event. Tomorrow I'll share another layout that goes with this one. 


Supplies
Lollydoodle Paper
Lollydoodle stamp set from the Workshop on the Go
Lollydoodle Complements
Cotton Candy Ink Pad
Slate Ink Pad
Flamingo Dots

Some close ups


You can find the SG sketches in their books and as downloads in the SG store, and there is a free one every month in case you wanted to try it out.

Next on the hop is Steffanie - http://steffanies.blogspot.com/


 leave a comment on each blog and one lucky commenter will receive a free sketch bundle of their choice from the store. The winner will be draw on March 9th, so you have one week to leave a comment.


In case you get lost at any point, here is the list all the blogs

Scrapbook Generation blog - http://scrapbookgeneration.blogspot.com/


YOU ARE HERE   ** Tina Gale - http://tiggersscrapplace.blogspot.com


March CTMH Specials


 If you don't do digital layouts check out the fabulous new photo well feature to print out your photos. This is great for those odd sized photos or for the new pocket page protectors.


 Stamp of the Month


$5 with your $50 purchase
or $17.95


Sunday, March 2, 2014

Month In Review - December

Well we've come to the end of my album; December. I will have memorabilia pages at the end but I won't bore you with those. I hope you've enjoyed a peek into this process and try it for yourself. I know I will continue to do it for a long time. It is so quick and satisfying to see a complete year and all our memories preserved to enjoy by the whole family.


Some details

I love these embellishments. They were on our While Supplies Last section a while back and bought a slew full. They're so pretty!
Be sure to check the WSL section often for great buys like this one.


I had a little girls get away last weekend and was able to prep all of 2014 pages so I'll be sharing those soon. I look forward to sharing with you this year my layout for each month. I hope you'll give it a try and join me here as we work on them together.


March CTMH Specials


 If you don't do digital layouts check out the fabulous new photo well feature to print out your photos. This is great for those odd sized photos or for the new pocket page protectors.


 Stamp of the Month


$5 with your $50 purchase
or $17.95


Saturday, March 1, 2014

A New Way for Odd Sized Photos


During the month of March, order your Studio J layouts—including ones using our new 
Photo Express Collection—for only $5 each! Quickly create gorgeous, personalized studio layouts using our wide selection of papers, collections, patterns, and embellishments.  
And don’t forget to check out the templates in our new Photo Express Collection, which 
allow you to design layouts entirely comprised of photos in minutes.** 


March CTMH Specials

Have you tried digital scrapbooking? Close to my Heart has a wonderful program called Studio J that is quick and simple to get layouts done without losing the quality and artistic side of scrapbooking. You can try it for FREE and only pay when you print your layouts and this month it's only $5. You also get a FREE jpeg for every layout ordered.


Try on of our Express Collections for the quickest of scrapbooking at it's finest. Or create gorgeous personalized layouts using our wide selection of papers (including retired papers) collections, patterns, and embellishments. 

If you're not into digital scrapbooking try our new Photo Express Collection, which allow you to design layouts entirely comprised of photos in minutes. This is perfect for those odd sized photos to use in your Picture My Life, Project Life, brag albums, or any art not using the standard size photos.

To do this, all you need is your digital pictures, a computer and internet access to use the Studio J software -- and this tutorial where fellow consultant, Ellen walk you through how to get the most out of your Express Printproject. She has the entire tutorial on her blog but I've copied here and added my own notes in places. Thank you Ellen for sharing this wonderful tutorial.


It's EASY and FUN ... and best yet, in March, all Studio J layouts (including Express Print) are discounted to just $5.00 (plus tax/shipping/handling) for two 12x12" pages, with as many pictures as you can fit on those 288 square inches!! (The regular price is $6.95 ) Shipping/handling rates for Studio J™ layouts are a flat rate of up to 50 layouts in a box: $5.95 USD 


Step 1: Let the Fun Begin with Studio J!


 This is your opening screen, shown below:


Step 2:  Create an Account – It’s free and easy!Here is what the screen looks like, and what you’ll need to complete:


Step 3:  Welcome to Studio J!  Here you’ll find ways to create or open your existing projects (top right click), start a new project (middle right click), or how to buy/print your projects (bottom right click):

Here is what the screen looks like:


Step 4:  Today, I want to show you how you can use your Studio J “layouts” as a printing service for your digital photographs by using what is called “Express Print”.  You can arrange the photographs in any size configuration that fits on two 12” x 12” digital pages and, during the month of March, have those photographs printed for just $5.00 for each two-page spread (Regular retail: $6.95).  


To start, click the middle link: “Create a new project”
You’ll see that I’ve named my project: “Pictures for PML” – that’s Picture My Life™, Close To My Heart’s newest product for 
scrapbooking-on-the-go.  


With the Picture My Life™ specially-designed layouts produced with sectioned page protectors, your photos can be full sheet (12” x 12”), or 4”x6” (horizontal  or vertical) and/or 3”x4” (horizontal or vertical).  


Here are the designs of the sectioned page protectors currently 
available in Picture My Life™:


Design 1 – 12 x 12” page protector: Full sheet.  Available as top loading or side loading to fit in your
D-ring or post-bound albums, in packs of 10 or 25;
also available to fit your strap-system album,
in side loading value packs of 25.
 

Design 2 – 12x12” divided into 6 sections,
each 4”h x 6”w (horizontal photos).
Holds 12 photos (using both sides)


Design 3 – 12x12” divided into 4 sections
that are 6”h x 4”w (vertical photos),
plus 4 sections that are 3”h x 4”w (horizontal photos).
  Holds 16 photos, using both sides.


Design 4 – 12x12” divided into 4 sections
that are 4”h x 6” wide (horizontal photos),
plus 4 sections that are 4”h x 3”w (vertical photos).
Holds 16 photos, using both sides.

Design 5 – 12x12” divided into 3 sections
that are 6”h x 4”w (vertical photos),
plus 6 sections that are 3”h x 4”w (horizontal photos).
Holds 18 photos, using both sides.


In addition, you can expand the possibilities of how your pages look and how many photos each page can accommodate, by using Close To My Heart’s unique Flip Flaps™. 

 Flip Flaps™ are individual protectors with an adhesive strip, made in convenient sizes to attachover your page protectors to add more photos or journaling to conventional layouts.  You can also use them with your Picture My Life™ albums in the same way! 


So be sure to design your Studio J™ Express Print pages to include some photos in the Flip Flap™ sizes you want to use in your albums. Those sizes are:


2 x 2”, 3 x 3”, 3 x 4”, 4 x 4”, 4 x 6”, 4 x 12”, 6 x 6”6 x12”, and 8 x 12”


Step 5:  Upload your pictures. 


Step 6:  After you've uploaded pictures 
See the tab in the bottom right that says “CONTINUE”?  Click that!


 Step 7:  To use the Express Print feature of Studio J™, you’re going to want to design your own Custom Layout. So click the bottom link, “Create Your Own Custom Layout” when the Select A Layout Type screen appears. 


Step 8:  Now the next thing that will happen is that Studio J will load its kits.  For the purposes of “Express Prints,” you’re not going to be using a kit. However, just allow Studio J to load the new kits. Your screen will look like this:


Step 9:  Pick any paper that suits you – it doesn’t matter, because for this, we’re not using the paper. Pick one and you’ll be taken to layout PATTERNS, and your screen will look like this:


You’ll notice that all of the print patterns are shown alphabetically. I want you to scroll down to the pattern that is titled: “NO LIMITS”.  Click on it:


Step 10:  It’s kind of silly here, but it’s asking you to pick whichever “mix” on blank pages – and you’ll see no mix, like this:


That’s okay.  Double click on any one of them – I usually pick door #1 (far left).  Here’s what your screen will look like next:


Step 11:  Next you’re going to want to create your “photo wells”. Click on the first tab underneath all of your photos on the left – the one that says Text & Photo Areas:


See that bottom box on the left column that’s marked Photo Area?   While your cursor is over that box, left click and hold to drag a box onto your upper left side of your page one (left) as I did here:


You’ll see that there is an operations box that opened up next to the space for the photograph that you’ve placed.  Here, this is a horizontal 4x6” photo.  You can change the size by simply changing the dimensions in that box (typing the numbers), or by grabbing the arrow to the lower right of the photo, and dragging it to whatever size you want. 


Matting your photos: Your photos don’t need a mat if you plan to trim them for a layout or matting on paper, also CTMH does not recommend you use the mat feature as it may skew the photos.


 Continue filling your layout with photographs of your desired shapes/sizes, simply by grabbing another photo box from that left column and dragging it into position on your layout. Resize them manually by grabbing the drag arrows, or be sure your sizes are a perfect fit for your Picture My Life™ spaces or your Flip Flap™ pockets by typing in your desired dimensions.  


Remember, Picture My Life™ only uses 4 x 6” or 3 x 4” sizes (either horizontal or vertical), while there are wider varieties of sizes available in Flip Flaps. 

Another hint:  When you’re dragging your photos into place on your layout and you want to snug up the pictures next to each other, remember that your arrow keys on your keyboard can be used to move the photographs too, one little space at a time.  This makes it easy to ensure you’re using all of the printable surface, and maximizing your dollars when printing these pages. 

If you’d rather save some of the space for titles or Journaling boxes that will print along with your photographs, grab those boxes instead.  These are handy to print out to use on your traditional layouts, or made to size with your Picture My Life or Flip Flaps. 

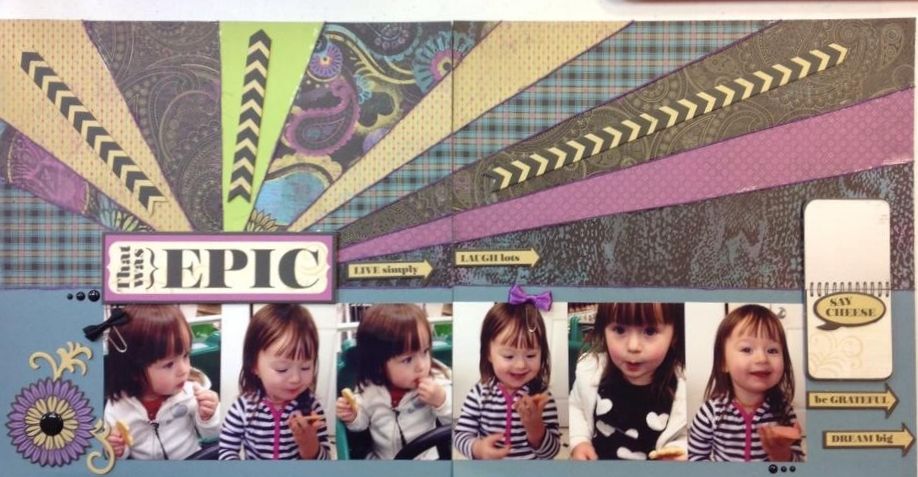
OK, my layouts are done and now it’s time to drop the photographs in place.

Here are the photographs I’ll be needing to complete my future layouts, along with a title:


Step 12:  Drop in your photographs.
Go back to the upper left-hand column and click on where it saysPhotos.  This will bring in all of the photographs you have downloaded for this project.  (You CAN add more at any time!)  

Move your computer’s cursor over to the photo you want, and left click and drag the photo into the space you want.  

You’ll see on the Operations Box that opens with the photograph that you can increase the scale of your photograph.  When you increase the scale, the center focus of your photograph may now be out of the print area.  Do you see that in the middle of the photograph there is a handprint?  Move your cursor atop of that handprint and left click/hold to drag the portion of the photograph into the print space. 

For example, here is a picture placed at regular scale:


Here it is scaled to 250% before I’ve grabbed the hand to move it:

Here it is after I’ve moved it into my print position:

There are also all sorts of special effects you can apply to your photograph. For example, here is a picture that has had a Sepia filter applied, and the photograph has been rotated 60 degrees:


Here she’s flipped horizontally, and converted to Black and White:


….and if that isn’t sweet enough, you can also edit any of your images, just by clicking the Edit Photo box (third from the right, top, in the Operations Box) to take the photo you’re working on directly to the editing function:


For example, if I wanted to make my little Munchkin into a Leprechaun, I could toy with the saturation and hue:


Not to worry, there are UNDO and REDO buttons in the upper left of the Image Edit screen!  

There you have it, I’m done, in twelve easy steps!


When you’re ready to purchase your layouts, click “PURCHASE” in the upper right hand corner, and your project menu will appear. To the right of the project menu, you’ll find “Add to cart”. Each two-page layout is currently $6.95 but is on sale throughout March for just $5.00. And best yet – whether you buy four layouts (the minimum order) or fifty -- they ship for a flat $5.95!


Stamp of the Month


$5 with your $50 purchase
or $17.95