Showing posts with label A Childs Year. Show all posts

Sunday, December 28, 2014

CTMH - Grateful Bookmarks

I know this is way past thanksgiving but I just realized I never posted it. I was waiting until all my scrap club participants received theirs. You could totally do the same technique with lots of shapes and being grateful is always in style. ;o)

I was inspired by Danielle Flanders Dipped Die Cuts post. She made tags that were gorgeous so I decided to take CTMH products and do something similar.


I used Cricut Craft Room and the CTMH Artbooking cartridge to create my bookmarks with the word grateful cut out of it. I then created a slightly larger shape for a shadow. The leaves are from the same cartridge and one is from A Child's Year.

I used some retired leftover papers to cut the leaves from then used versa mark ink to rub along the edge, dipped in gold embossing powder then heat set. Aren't they lovely? I just love the gold dipped edges. Found some buttons from my button jar and sewed it onto two leaves then tied a piece of twine around the stems.

I used a brown pen to do stitching around the bookmark and then they were ready to adhere all the layers together.

These are going to some special ladies that I have the privilege of scrapping with every month. They are my best friends and biggest supporters of my CTMH business. I'm so grateful each time I get to spend time with them and do the thing we all love to do.


I hope you enjoyed my little project today even if it was a little late in coming
Hugz
TinaGale


Wednesday, July 6, 2011

Fourth of July

Hello everyone! Tina Gale here back with another layout for sweet sassy diva design team. This time our challenge was a Fourth of July stars theme. I usually don't like to make my layouts before I have the pictures but because of how busy I've been lately with my husbands chemo treatments I decided to get a quick page together for photos that I'm hoping to receive of my son doing the fireworks for the kids camp that he and my daughter work at. I know I'm not the only one that gets things thrown at them that can put a halt on their creative time so I decided to share how you can put together a really quick layout that still has a wow factor.
I decided I'd try and walk you through my thought process when I design a layout and hopefully it will help some of you. Like I said before I never scrap before I have photos because it never works out for me. My photos are never the right size or their the wrong direction for my mats. I also get inspired by my photos so that is where I usually begin. Obviously that's not the case this time but I did start with what I know I want my photo to be of. My children work at a kids summer camp and my son works the activities. One of his biggest thrills of the summer is getting to set off the big fireworks for them on the 4th so I immediately thought of the great silhouettes on A Child's Year. This little boy riding the rocket was perfect! It reminded me of my son and the thrill he gets doing the firework show so that was where I started.
Next I went in search of paper. I had several different patriotic looking papers but this star background was perfect for my quick layout. Sometimes it's very difficult working with patterned paper that has a finished layout look to it. It can look very flat and uninteresting as well as scare some people to cover certain elements on the background up. The key  is not to be afraid of it but use it to it's full advantage. This paper with the glittery stars and fireworks at the bottom left corner was a perfect backdrop for my layout. It brought a lot of interest to the layout without doing anything else but to really give it the 'wow' factor you don't want to stop there and with your cricut it's easy to step it up a notch.

The next element is always a great title and you don't want to forget to leave a place to journal. I chose a great title from Graphically Speaking cut with red and gray for an extra punch.
For the journalling I decided to use some white cardstock cut in 1/2" widths at various lengths to jot down some quick thoughts. It adds some great design interest to a quick layout.

The next element are your photo mats. I chose this wonderful red with silver star paper cut at 4x6 for my photos and then tied some red, white, and blue bakers twine around it for added dimension and design.
Then to tie everything together and help pull the design in I cut stars out in various sizes from 3/4" - 1 1/4" from Graphically speaking and scattered them around the layout.
I also used my bakers twine again to tie around a couple of the stars for some extra 'wow'.
Recipe for Stars for the Fourth
Paper - American collection from the $1 spot at Target
Airmail Bakers Twine - available here
Cricut Cuts:
Fourth of July 1 1/2" - Graphically Speaking - p. 43 
Stars 3/4" - 1 1/4" - Graphically Speaking - p. 43
Boy on rocket 3 1/2" - A Child's Year p. 46

I hope you enjoyed my layout and find my tips helpful the next time you want to create a quick layout. Be sure to visit me at my blog for more great projects! 

Hugz

Sunday, May 8, 2011

Happy Mothers Day

Happy Mothers Day to all you moms out there. I'm so blessed to have both my kids home today. My son finished college on Thursday and came home for the weekend before he moves to his summer job at a kids camp. My daughter will be working there but not going out as soon so I have her for a little longer.

We're all going to my mom's for dinner and to have cake for my birthday as well as celebrate Mothers Day. My brother has wonderful grill and smoke skills so I'm looking forward to a great dinner. LOL

Here's a card I made for my mom. I scrap-lifted the idea from a card in the recent Cricut magazine. If you haven't checked out their new magazine you should. It's fabulous. I just subscribed to 6 months and also won another 3 months in a recent contest. They're adding it on to my current subscription so I'll be getting it for 9 months. Of course I know I'll re-subscribe anyways. LOL
The cut is from A childs Year. I love this cart. Be sure to check it out if you don't own it.

I hope you all have a fabulous day!
Hugz
Tina Gale

Tuesday, April 26, 2011

Cricut Birthday Celebration

Provo Craft is celebrating  5 years of Cricut so a big Happy Birthday shout out to them. They had a layout contest for the big HSN launch airing today. The only requirement really was to use cricut carts and it had to be a 12x12 birthday layout. I ended up making two and submitting. There were a couple hundred of fabulous layouts submitted. Hopefully they'll post pics of them altogether somewhere.

This is my first layout.

 This little bird on a banner is a fav cut of mine off Birthday Bash!
 The cake I welded on my gypsy so it would flip up for a journaling box.

 And my favorite is this lil birdie! I spritzed a lil bit of white boa  with pink glimmer mist and then glued between two layers for a lil tuft of hair or feathers. LOL I think he's too cute!

The 2nd layout I did much more muted tones with a country feel. I adore it as well. The journaling spot is made with Imagine More. It has several great cuts for journaling spots. I love it!

 I used my distressed cuttlebug folder for my cupcake and then tied some twine around it. Inked and added a couple of buttons to finish it off.
 The little boy I cut double and pop dotted the top layer. You can't tell it here but it added a lot of dimension.
I hope you enjoyed my layouts. I stayed up all night to watch the Cricut Anniversary Edition  Expression 2 launch but ordered it an hour or so before launch and was able to use my 15% off coupon saving me an additional $50! Woo Hoo It should be here just in time for my birthday!

Thursday, October 21, 2010

Baby Album Continues

I've finally got going on my son's long overdue baby album again. I swore I would have it done by the end of summer but didn't make it. Then I said by his 20th birthday which was Oct 4. Hump, I'm determined to finish it before the end of the year though! LOL Seriously!!


This is month 6 and his Easter pics. I used some embellishments I had in my stash such as the ribbon title, rub on, and the duck stickers.

This page I used A Child's Year to cut out the toy ball and stars. I inked everything and added some pearl bling for dimension.
Sorry about the photos. I used my daughters camera because I wanted to get them posted. It usually does a fair job but the pictures look a little grainy and miscolored this time.

I hope you enjoy following me on my journey and quest to finish this album. I'd love to hear your comments or even just a note of encouragement to keep going. LOL
Hugz
Tina

Wednesday, August 25, 2010

The next set of pages is bringing baby home and meeting family.

The journaling stamp is from the $1 stamps at Michaels. I decided to hand journal the entire album. I don't like my handwriting but I wanted it there for my son in years to come. The family stamp is from Technique Tuesday. I love all the pieces of this stamp set and how you can build different looks with it.

Cricut cuts from:
Cindy Loo -Tree
A Child's Year - Girl pushing Buggy

Tuesday, August 24, 2010

Baby's 1st Year Album

My goal this summer was to put together my son's 1st year album. Of course he turns 20 in another month so I don't think I started a minute too soon. LOL I have 24 years of photos to scrap and I mostly work on current photos while the memory is fresh and I can do more meaningful journaling. Unfortunately that means my children do not have albums completed. Gasp, the thought of being so far behind. I confess all of this to you so you don't feel bad about how far behind you are. LOL

I used several cartridges and my cricut throughout the album and will try my best to post where each cut comes from. The paper is from My Minds Eye. I fell in love with this line and it made the album go together really quickly and flow together nicely. I'll be posting the pages throught the next couple of weeks so stay tuned for more.
This is the title page. The star is a chipboard star from my stash as well as the sticker and round frame on it.

Cricut cuts from:

Journaling Tag
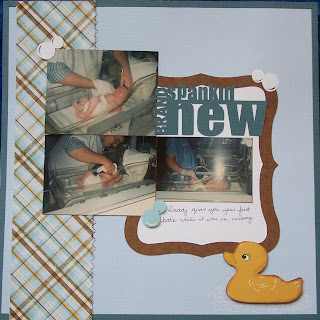
A Child's Year - Teddy Bear, Baby boy, Duck, Bubbles
Graphically Speaking - Brand Spankin New, Journaling Mat
Stork
Wild Card - Buttons
Create a Critter - Moon

Friday, September 11, 2009

A Childs Year card


I just received A Childs Year cart and had to try it out. This is a really quick card I put together.


I used the apple silhouette cut and the button embossing folder from the Just My Type set.


Hope you enjoy


Have a blessed day