Thursday, February 16, 2012

Seasons Greetings

Hello everyone! If you're like me you may just now be scrapping Christmas photos and these happen to be from several years ago. LOL Oh well at least they're done now. Hopefully it will inspire you to get yours done and not wait like me.

I used a free sketch from Scrapbook Generation. I absolutely love Allison's sketches.


Season's Greetings is cut from Celebrate with Flourish a cricut lite cart from Wal-Mart. I was lucky enough to get it with my cricut rewards points by being a circle member.


The tickets are a stamp from unity stamps that I picked up at the last CK convention. I fell in love with them and they were a perfect embellishment for this layout.


I spritzed glimmer mist in opposite corners to break up the white and add some glimmer. I used a MS border punch across the bottom.


Supplies:
paper from Hobby Lobby
MS treading water punch
Unity stamps
Celebrate with Flourish cricut cartridge
Glimmer mist


Hope you enjoyed my quick layout and are inspired to get your Christmas photos out and scrapbook them.

Hugz

Sunday, February 12, 2012

Roxie Jewelry

Today on sweetsassydiva we were asked to create something that was not a layout or card but something different. Well jewelry is definitely a big different.  I found this on a fellow consultants blog and just had to try it. It is so easy and cheap but fabulous looking! See if you can guess what it's made with.


The ring and necklace are metal washer! Isn't that fabulous? You should have heard my husband when I asked for some from his stash. He wanted to know what I needed them for and when I told him I was going to make jewelry he kind of gave me that puzzled here she goes again look. LOL


I sponged the edges and back of the washer with black staz on ink. Using liquid glass adhere a small piece of paper to the washer and then let dry. Then I sanded the edges and inside hole with a file. Cover the top with liquid glass and then plop the bling on. Next find a place it can dry for several hours. If you get any bubbles while it's drying just pop them with a straight pin.


For the earrings I just circle punched the paper and glued it in using the same process. For the necklas you'll want to tie your waxy floss or whatever you're using through the hole and glue the jewel afterward the liquid glass has dried.
The ring base and the earrings came from Michaels. Everything else is CTMH.

Supply List:
Meal washers various sizes
Ring Base
Earring Bases

I hope you like this project as much as I do. I encourage you to try it for yourself. I get so many comments when I wear it.

Hugz

Friday, January 27, 2012

Cricut Craftin Friends Blog Hop

Cricut Craftin Friends Blog Hop 
Celebrating Cricut Craftin Grammys 1 year
Blogaversary



We're so happy you could join us for this hop celebrating the one year blogaversary of Cricut Craftin Grammy. I have asked a few of my Cricut Messageboard friends as well as my Design Team friends (Fantabulous Cricut Challenge Blog, Lasting Memories and Sweet Sassy Diva )to join her in this two day Blog Hop. The participants are allowed to share anything creative they wish to share using a Cricut (or other die cut machine if they do not have a Cricut.)

Overall Blog Candy

I hope you will hop along with us and leave comments along the way. For the overall blog candy you need to leave a comment on each blog each day.

If you leave a comment on all the blogs both days your name will be entered into the Random drawing twice. The random winner will receive a $25 gift card from their choice of Michaels or Joanns.

This is a TWO-DAY hop, so be sure to check out both days so you don't miss any creativeness. Because there is a large number of participants I will give you until January 30th to post your comments for the two days of the blog hop.  Thanks for joining us!

Let's get hopping!! If you've hopped over from Mindy, then you are in the right place!! If you've just popped in to visit my blog or are reading this via email and you'd like to join our FUN, then please CLICK HERE to start at the beginning with Suzanne's Blog


Thank you so much Suzanne for inviting me to celebrate your blogiversary today. I thought I'd share a great project inspired by a fellow CTMH consultant. I think we can all agree we need help getting more organized and so I love it when we can accomplish that and scrapbooking at the same time. Instead of getting a plain old white wipe off board let's make one and customize it to match any room, style, or color you like.


First you need a picture frame. This is a 11X14 but you could use any size or style.
Next choose your papers and let's have some fun.
I cut paper to fit through my printer and did a simple document for the days of the week and printed it straight onto the patterned paper.

I used the CTMH Art Philosophy Cartridge for all of my cuts. If you don't have this cart you are missing out on the best cartridge PC has ever done. It has a lil bit of everything to keep you busy for a long time. There's two fonts with uppercase and lowercase, 3D projects such as boxes, bags, and even flowers, borders, doilies, banners, scrolls, and images galore.


Supplies:
frame of your choosing
Wipe Off marker

Thank you again for checking out my project...
and if you'd like to check out any of the products I used today click on the links and it will take you right to the item. I'd love to be your CTMH consultant if you don't have one yet.

 Now hop to the next stop: Jen...
Remember to visit all the stops for MAXIMUM ideas and LOTS OF FUN!!

Suzanne http://cricutcraftingrammy.blogspot.com/
Also posting for Cindy who does not have a blog
Fantabulous Cricut Challenge Blog Friends
Charlotte http://alittlebitofdetail.blogspot.com/
Robyn http://robinscreativecottage.blogspot.com/
Melanie http://melaniemakes.blogspot.com/
Beckie http://justbcreativecrazy.blogspot.com/
Faith Abigal http://www.faithabigaildesigns.com/
Kate http://smallbitsofpaper.blogspot.com/

Lasting Memories
Stacia http://happyandscrappytoo.blogspot.com/
Michele F http://fishmememoriesandmore.blogspot.com/
Elizabeth http://visionsofpaper.blogspot.com/
Karen http://creationsbykw.blogspot.com/
Denise http://thruthelookingglass-glassgraffitix2.blogspot.com/
Michelle http://scrappinforkenzie.blogspot.com/
Jennasa http://findtimetocreate.blogspot.com/
Kimberly http://leokc34.blogspot.com/
Amy http://www.lovetocrop.com/

Message Board Friends
Terri http://craftmeaway.blogspot.com/
Brenda http:// friendscraftinwithfriends.blogspot.com/
Rachelle http://creationsbyrachelle.blogspot.com/
Shawnee http://quiverofangels.blogspot.com/

Sweet Sassy Diva Blog Friends
Lori http://www.scrappinmystressaway.blogspot.com/
Mindy http://grammiescraftroom.blogspot.com/
<< Your are Here>> Tina http://tiggersscrapplace.blogspot.com/
Jen http://3catsandabug.blogspot.com/

Wednesday, January 11, 2012

Winter Blues

Our challenge this week for Sweet sassy Diva DT  is Winter Blues so I made a second page to go with the layout I shared on Sunday. I'll add journaling to the bottom right space with a silver or white pen.


The scallop strip is the zip strip trimmed to show the scallop. I love using the zip strips from CTMH papers to create borders and trims on my layouts.


I cut a couple of rectangles and then corner rounded one and cut into the other one to create a ribbon look. Everything was inked with chocolate ink and a sponge dauber.

Here's the complete layout. Be sure to check out Sundays post here for all the details on the first page.


Supplies:
CTMH Wonderland paper pack
CTMH Winter Joy stamp set
CTMH Art Philosophy cartridge collection
Chocolate Ink Pad
Twilight Ink Pad
Sponge Daubers


I hope you enjoyed my layout this week and inspires you to scrap some of those winter photos.

Hugz
Tina Gale

Sunday, January 8, 2012

Snow Fun with Frosted Designs

Today I have a layout that I did using a sketch I found at Frosted Designs. I just found this blog but I love it so it's definitely becoming one of my regulars to check out. Here's the sketch.


And here is my layout. We don't usually get a whole lot of snow and we don't have any big hills near our house but that doesn't stop my husband from taking our kiddos sledding. This is my daughter and her Daddy sledding with his new four wheeler two winters ago. They had a blast! Of course my husband being the ornery one tried to find the most ways to bury her in snow in the process. He did a pretty good job at it too. LOL


I used the Wonderland paper pack from CTMH. It was perfect for these pics in the snow. A full list of supplies and links are at the end of this post.


I trimmed  the zip strip of the paper to make the scallop border. The zip strips are just one of the things I love about Close to my Heart papers. The title is cut from the font on the CTMH Art Philosophy Cartridge. Have I told you how much I love this cart?!!


My little journalling strips are stamped with Winter Joy from CTMH.


The snowflake from Art Philosophy was perfect to add my little photo of them going down the driveway off to find some adventure.


Supplies:
CTMH Wonderland Paper Pack
CTMH Art Philosophy Cricut Collection for Snowflake and title
CTMH Winter Joy stamp set


I hope you enjoyed my lil layout today and come back this week for the second page to complete it.

Friday, December 23, 2011

Let It Snow Card

This week is Let It Snow at SweetSassyDiva and can we say I am snowed under with last minute gifts to buy, cards to send, and a house to clean. LOL So today is going to be sweet, simple, and quick for that last minute holiday rush we all find ourselves in.  This is a little gift card you can make in just a few minutes for those special gifts you hopefully have already bought. Ha ha


The card is 3x3 with a   1 1/4 "  strip of CTMH Wonderland paper. The backside of the paper is this beautiful blue square. I cut the snowflake at 3/4" from the CTMH Art Philosophy cart and then stamped it with CTMH Crystal Blue and the  December 25th  stamp set. Joy is stamped in CTMH Cocoa from the  Holiday Wishes stamp set.

I hope you enjoyed my quick little card and try one for yourself today. If you don't have a CTMH consultant already I'd love to take care of you. You can shop by clicking on the links in my description or feel free to email me with any questions.


Hope you're holidays are wonderful
Hugz
Tina Gale
ctmh.com/myscrappyideas

Wednesday, December 21, 2011

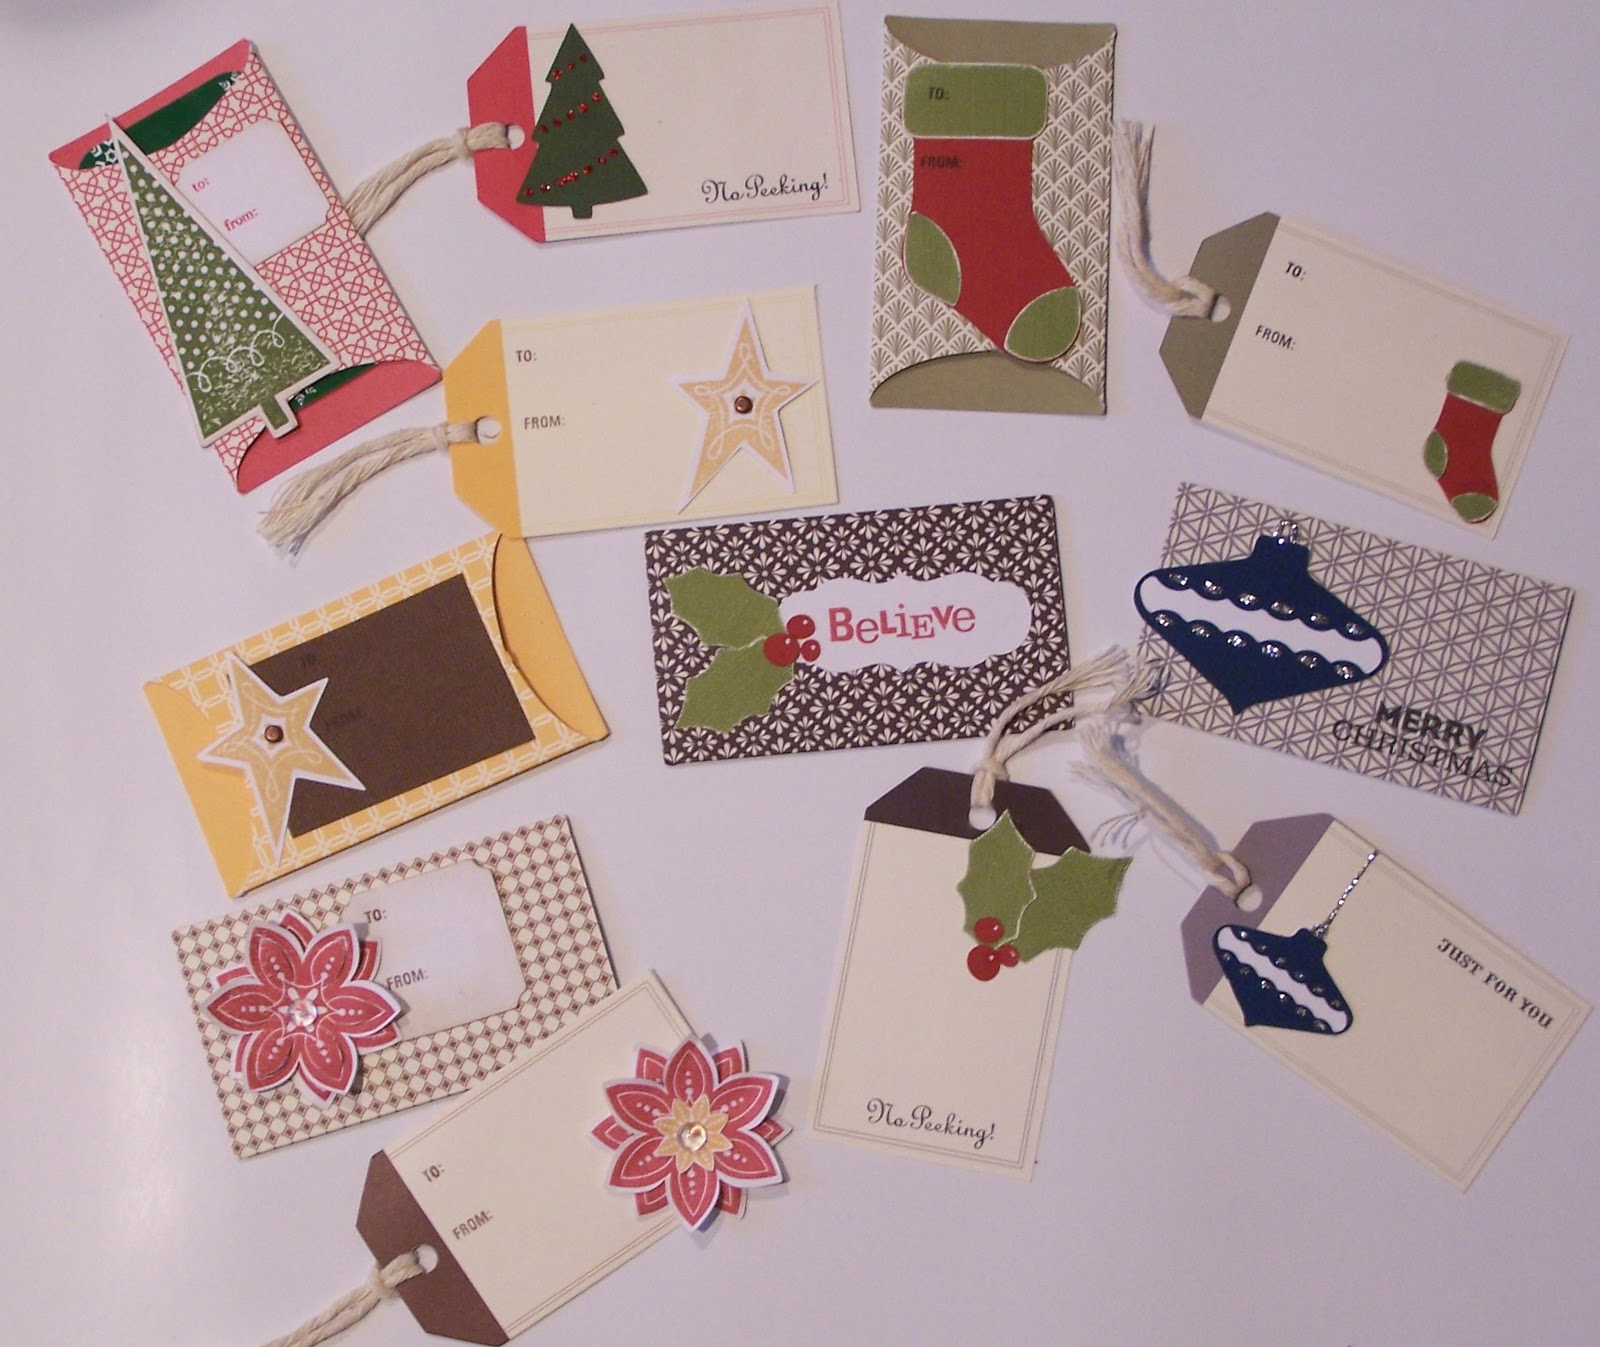
CTMH Gift Tags

How are you all doing getting ready for Christmas? Have you got all your gifts bought yet? How about wrapped?  I actually have all of mine bought but have a few left to wrap. Today I'm sharing some great gift tags. This was totally not my idea but I lifted it from another CTMH consultant. It's just too great not to share.


These are all made from fabulous CTMH Decor Journaling Spots. You receive 12 pockets with a coordinating tag.  When you add some stamps you end up with some fabulous gift tags and gift card holders. The pockets are the perfect size to slip a gift card into. Isn't that fabulous?!
I used cuts and stamps from the CTMH Art Philosophy Cartridge Collection and stamps from the Holiday Wishes set.


Details:
CTMH Ink Pads in Cocoa, Olive, Cranberry, Creme Brulee, & Black


Hugz
Tina Gale

Tuesday, December 20, 2011

No Peeking

Here's another great little card that works up super quick. It's a 2 x 3 card so it's great for  gift packaging.


Here are all my supplies cut, stamped, inked, colored, and ready to put together.


And another shot of the complete card. Be sure to send me a link if you try any of the cards I've shared.


Details:
CTMH Art Philosophy Cartridge Collection
CTMH Cocoa Ink Pad
CTMH Elemental Paper Pack
CTMH Dark Green SHade Pack
CTMH Dark Neutral Shade Pack
CTMH Olive marker
CTMH Cranberry marker
CTMH Christmas Cheer stamp set
CTMH December 25th stamp set

You can buy any supplies you may need by clicking on the links above or go shopping by clicking the shopping cart below.


Hugz
Tina Gale

Saturday, December 17, 2011

Do Not Open Until December 25th

Day 5 of another quick easy gift card. Are you enjoying them? Today I actually have a card and a tag so you can see how easily it is to adapt a design to anything you need.

The card is 3X3 and I cut the tag from the CTMH Art Philosophy cart. Inked around the edges of everything with some cocoa ink for a bit of country look. I attached the strip of plaid with a brad. Quick, simple, but oh so cute!


Now I took  the same design but cut a 2 1/2 X 3 " tag from the Believe paper pack and stamped on a piece of white cardstock. This time I added some bling to the plaid strip and ribbon cut the ends. Now you have quick little tags for all your gifts. You could also stamp the image again in red and then cut out the until rectangle and glue it on top for some added contrast. Either way they're the adorable finishing touch to any gift.

Recipe -
Tag - CTMH ARt Philosophy cartridge cut at 2 1/2"
CTMH Bling


I hope you're enjoying all the quick little cards I've been sharing and try them for yourself.
Hugz
Tina Gale

Friday, December 16, 2011

Happy Holidays Card

Day 4 of my quick easy cards. Have you finished all of your cards yet. I'd love to hear about them or the lack there of. LOL


Details:
Cheerful Seasons - Holly 2 1/2"
Happy Holidays stamp
Green stickles

Hugz
Tina Gale