Showing posts with label Organize. Show all posts

Monday, February 20, 2017

Illustrated Faith Organizing Bags (Dayspring)

I'm so excited to be able to share with you two of the new Illustrated Faith products from Dayspring today. The organizing bag and kangaroo pouch. How cute are they? They both have that classic Shanna Noel look to them with fun designs and colors!


The organizing bag is large enough to carry everything you need to Bible Journal on the go including your Bible. The kangaroo pouch is perfect to add some of your basic go to supplies and hook right on to your Bible or planner like I have. Here's a close up look at both the bags and I've shared how I organize and pack my supplies for on the go.


I know we're all incredibly busy and on the go all the time so I'm stoked that I can have such a compact and cute way to keep me Bible Journaling no matter how busy life can get. I can carry all my favorite go to supplies with me everywhere now and the bag is a great conversation starter to share your faith with those around you! If you're like me sometimes it's hard to talk to people I don't know well but with an ice breaker like getting a complement on my bags it gives me the perfect opportunity to share about Bible Journaling and my faith.


You can pick both the 
up in the Dayspring store 
Monday, Feb 20th and don't forget to use my 
discount code 25FORYOU 
to save 25% and get FREE shipping!!


I'd love to hear how you organize and find time to Bible Journal when life gets busy.

Hugz
TinaGale

This post contains affiliate links which means if you buy through them it won't cost you anymore but I will receive a small commission. Thank you for helping support me with the content of this blog and youtube channel!! It means so much to me.

Friday, July 17, 2015

Organizing Roller Stamps with Process Video

If you're like me you've gotten a few roller stamps and you might not be using them for the same reason I wasn't. i simply couldn't remember what I had or read them when I thought about using them. I decided to do something about it.


Here's a look at my solution.

If you're reading in email click the link below to watch
Roller Stamp Organizing

I cut my cardstock to 3x5" and corner rounded them. I matched the color of my stamp handle to the cardstock and then stamped each stamp on them. Punch a hole and put them on a ring and you have a fabulous visual tool to remember what you have so you can get some good use out of your roller stamps!

I hope you find this useful and give it a try. Let me know if you do and how you like it. Also if you've found other ways to organize and use them tell me about it or leave me a link.

Hugz & Happy Scrapping
TinaGale

Thursday, April 23, 2015

Making Page Kits & Packing for a Crop

Hello everyone!


I often get asked how I prepare for a crop. If I package kits or pack everything. How do I make kits up and what all do I include? How much prep work do I do? What about sketches?

I have two videos up that I filmed while I prepped for a 3 day crop so hopefully I can share my thoughts and processes that I've learned that work for me. Everyone is different so take what will work with your scrap style and leave the rest behind.

I have learned I'm much better packing kits and not bringing an abundance of supplies. My mind is the type I can spend all day trying to decide what to work on, what paper to use, what photos to scrap and let's not even get started about embellishments or coming up with titles and journalling.

I used to not enjoy going away to scrap because I wanted to get something accomplished and it never felt like I could get anything done and it was such a hassle to pack everything up. This was also a time that i didn't get to scrap a lot so scrapping was a top priority.

Now I get to scrap quite a bit on my own and I like to go to crops and scrap along with friends, chat a bit, and see what others are working on. So now my goals are different and I've learned how I can be more productive but also have fun and relax at crops as well.

Here's a look at what all I've decided to bring, how I decided to make my kits up for this time, and how it all fit in my new rolling tote and shoulder bag. LOVE them!!


I'd say if you're going to go to a crop the first thing to do is decide what your goal is. Do you want to get x amount of layouts done, do you want to relax and have fun, do you want a bit of both?

Once you decide then decide how your mind works and if you need to narrow your choices down by making some kits up. Do you need to narrow further down and kit by theme like I discussed in the video or are your photo driven and want to scrap particular photos?
Or do you need a little bit of all your supplies and fly by the seat of your pants and enjoy the whole process of creating with whatever comes to you at the moment.

In other words how structured do you need to be with your decision making and process? Then go for it and enjoy your time. Don't let anything get in the way of just enjoying yourself. You may have surprises or mishaps but stay flexible and enjoy your time scrapping with friends.

And here's a look at the 16 pages I made from my kits. I think this is the most productive I've ever been and it's in large part to all the pre planning I did before hand deciding what I wanted to accomplish from the weekend. I had a great time creating and visiting with friends I don't see often enough as well as eating a ton of fabulous food!! It was a fabulous weekend.


If you're reading in email click the links below to watch the videos
Scrapbook Layout Share

Here's a list of some of the things I packed
Rolling tote
Shoulder bag
Lg Organizer
Md Organizer
Iris Case
Page kits
Stitching Guide
Foam Mat
Piercing Tool
Tiny Stapler
Staples
Trimmer
Trimmer Blade Refill
Tweezers
Sketch Books
Scissors
ATG
Tombow
Glue Dots
Foam Dots
Liquid Glass
Corner rounder
Border Punches
Punches
Stamps
stamp cleaner
Stamp scrubber
Ink Pads
Ott Light
Cup Holder/trash bag
cutting mat
Alphabet stickers
Embellishments
Wet ones


Tuesday, March 17, 2015

Scrap Organizing - Packing for a Crop

In the last post I shared the fabulous organizing containers and storage ideas for all you scrappy products today I'm sharing how all of that and more fits into the new rolling tote.

This tote is fabulous if you don't have your own scrappy space and you want to store everything together and be able to roll it out to wherever you set up to scrap. Or if you do have a space then it's perfect for those fun crops and retreats we all love to go to. You can fit enough in here for an entire weekend crop! How fabulous is that?

Here's a look at fitting the organizers I shared in the last post all packed up as well as all the other essentials I take along with me to crop.


If you're reading in email click the link to watch the video.
Rolling Tote all packed for a crop

Not only did I pack all the supplies in the organizers that I shared in the last post but I also included the other essentials

 Crop Packing List:
Trimmer
Trimmer Blades
Score Board
Sketch Books
Stitching Guide with Foam Mat
Versamat
All Purpose Mat
Paper Packs
Paper Organizers
Workshop on the Go's
Cardstock
Album with Page Protectors
Mini Albums
Tools
Scissors

Plus everything we packed in our

Large organizer
Medium Organizer
Small Organizer


With all of that you are ready to go spend a weekend scrapping with friends or just a scrappy weekend at home! When everything is organized you can be so much more productive!

Shop with me at


You have 22" of space inside your rolling tote to fit all kinds of configuration of organizers. here are just a few

2 Large + 1 Medium
2 Large + 2 Small
1 Large + 2 Medium + 1 Small
1 Large + 1 Medium + 3 Small
4 Medium
3 Medium + 2 Small
2 Medium + 4 Small
1 Medium + 6 Small

Happy shopping!!


In March when you buy the consultant kit from me you'll receive the shoulder tote free and can earn the rolling tote free in your first 40 days!!


Hugz
TinaGale

Scrap Organizing - A Place For Everything

I love to organize and shop for things that make organizing fun, functional, and pretty. Today I'm going to share my organizing tips using the Close to my Heart Organizing containers and their new rolling tote. It's fabulous!!

First up CTMH has several organizing tools so check them all out at the link below
Organizing Tools

I'm going to concentrate on the containers first. We have 3 different sizes
Large, Medium, and Small

as well as several inserts to help you organize your inks, acrylic blocks, sponge daubers,  stamps and much more.


Here's a look at some of the things you can store in the medium and large organizers. You can pack a little of it all in one to get ready for a crop or own several and store your supplies in them all the time. You will be so organized and can spend all the time you usually look for supplies scrapping.

If you're reading in email click the link below to watch the video.

Some organizing tips by container:

Small organizer -

Gelato
Tools
Craft Boxes with small embellishments

Medium Organizer -
Tools


Large Organizer - 
6x6 paper pads with paper organizer
Thickers
Stickers
Chipboard Stickers
Piercing Tool & Foam mat
Tools

Next up is the new Rolling Tote and how to pack it all in to store for easy access or to go to a crop!


Monday, March 24, 2014

Organizing Challenge for new Studio

I'm sorry I've been missing. I got a wild idea about moving my studio so I've been packing and moving for over a week now. I'm beginning to see a light at the end of the tunnel. I have most of my furniture set up.

If you'd like to win a stamp set I have a little contest going on over on my Facebook page. Hop over there to leave your best organizing tip for me to be entered to win. If you don't do facebook you can leave your tips here.


A few pics of my space before


And the view from my desk. I'll miss this most of all!


A peek at the mess as we moved it all downstairs.


My hubby was fantastic! He kept moving it around until I was happy. The downside of being such a visual. LOL He's definitely a keeper!!


And a peek of what's lookin good so far. Hubby still needs to build a corner shelf to tie the cabinets together and 3x3 cube will go on top of it.


 I still have my office space to set up and all those misc baskets that you never know what to do with as well as my workstation. I'll share pics as I finish up.

I'm working on a box of die cuts right now. You know those leftover from your cricut/silhouette cuts that didn't quite work out. I'd love to hear your best tips on organizing these so i'll use them or else I'm going to have to just part ways with them for now.

Hugz
Tina Gale

Saturday, January 11, 2014

Organization Challenge - Cardstock Part 2

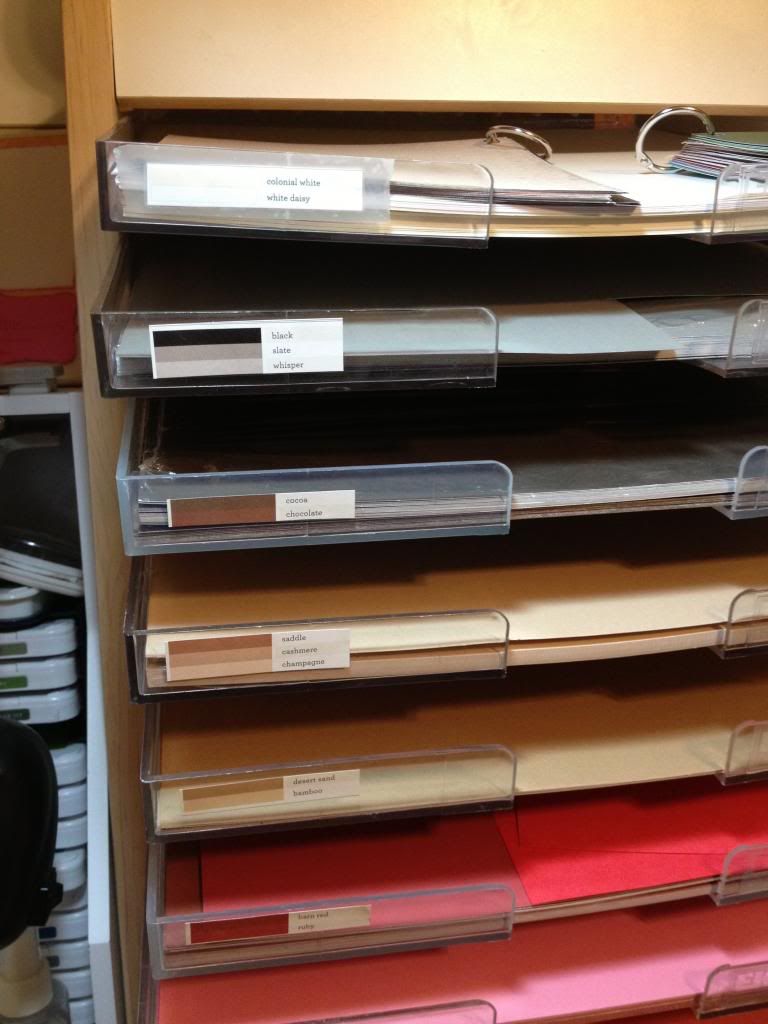
Are you ready to finish organizing your cardstock? First I pulled all my cardstock and started sorting according to color families and then from dark to light shades within a family. When I put them back I started with my Red family, then Orange, and so on.

I was then ready to start labeling my shelves. Remember that handy dandy labeler  I showed you yesterday? Well I ended up coming up with something else to use for this particular shelving. Since it's all my Close to my Heart cardstock for my classes and workshops I decided I would cheat a bit. I have several older Idea Books that have these lovely color charts in them for all of our colors. I trimmed them down and used for my labels. Now I have not only the name but also the color of the cardstock on the label. It's fabulous!


Isn't that pure loveliness?!! Have I told you how much I love paper?!! On the top shelf you may spot my paper samples as well. The one to the left is all our B&T patterned papers and the one to the right is all of our cardstocks. I use them quite often to come up with color schemes or when I'm working on projects to determine what will go well together.

Now I mentioned my other cardstock yesterday. I sort all of it in a separate cabinet. I sort it by color families and rainbow the same way but I have a section for all my Bazzil cardstock, a section for Recollections or Coordinations cardstock, then a section of shiny cardstock.

You may wonder why I separate it all. My reasoning is the Recollections and Coordinations cardstock is thinner and sometimes not the best for cutting in my cricut so I started a long time ago keeping it separate. It's easy for me to pick up a piece of paper and know if it will cut well or not but my kiddos play in my studio at times and I got tired of finding wasted cut up paper. Therefore I separated it and now they know where to find paper depending on what they want it for.

The shiny or bling cardstock is separate for obvious reasons. If you want bling it's easy to find. That about sums up all of my cardstock organization. I don't label any of this it's just coordinated by colors.

Now I'd like to hear your tips, how you store your paper, and even see a photo. Leave a link in the comment section and I'll be sure to check it out.

Next week we'll be tackling all those scraps! With having a cricut I keep all of my scraps and they've become a bit of a mess. I'll be sharing how I've tamed them.


Don't forget about all of 
I'd love to have you as a customer. Just let me know how I can help you with your scrapbooking needs.


Hugz
Tina Gale

Thursday, January 9, 2014

Organization Challenge - Cardstock

With the new year I'm determined to finish organizing my studio and purge supplies that are taking up valuable real estate. Are you with me? I'm going to try and share at least once a week where I'm at and a tip to help you tame an area of your scrappy life. I'd love for you to participate with me by sharing your tips and even photos of your space along with what issues you face or how you've organized your area.

First up is cardstock! I love paper and cardstock is part of that obsession. I have a tower to store just my Close to my Heart cardstock and I've been wanting to sort it by the rainbow ROYGBP for any of you artsy scrappers out there. I've also wanted to label them. Of course I've been out of label tape for over a year now and never seem to have the number when I'm somewhere that carries it. Being in rural America it's not like I run out and get it on the milk run. I finally saved the info to my smart phone. Smart, huh?! I was able to pick some up and it's pink to boot!! How fun!!

This is the label maker I have and I suggest if you like to be organized invest in one. It is so worth the investment. You can pick one up for around $20 and up, up, up but really an inexpensive one will work.


You can also type labels up on your computer and print them off onto cardstock and then trim them to the size you want. Then you'll have to come up with how you'll attach them. You could use various methods depending on what your labeling. More of that when we get into labeling.

For now think about your cardstock and how you would like to organize it. Do you like the idea of by color family, do you sort by brand, size, or a myriad of other ways? I do a combination of all and will give you more details in the next couple of posts. I'll be back tomorrow to show you my CTMH card stock all organized and labelled. 


Don't forget about all of 
I'd love to have you as a customer. Just let me know how I can help you with your scrapbooking needs.


Hugz
Tina Gale

Tuesday, July 20, 2010

Organizing Shelf for my Inks

First I have to apologize for neglecting my blog lately. I really thought I would have tons of time this summer with both kids working but they still seem to rule most of my days. LOL I wouldn't have it any other way though. I love my kiddos and miss them terribly. My sister also found out she has advanced stages of colon cancer. She's in the hospital and my mom has been staying with her. I really worry about my mom because she's diabetic and just had several surgeries to open blockage to her heart. They're an hour away but I try to take dinner to my mom and make sure she's taking care of herself. Well enough about me let's get on to the project for today!
I saw this shelf made out of foam board a while back and thought it was the coolest thing. Well I finally picked up some foam board and tried it. I love it! It works fabulous for all my inks including my copic markers. It is a lil shallow for the markers so I'm going to make a modified version to sit along side it for all my markers. Ok, I don't have all that many now but give me time. LOL

I have my SU pads on the far right and then my Memento and finally my Distress inks. The first I put slanted shelves in to hold my Copics and I have my versamark in the bottom right corner. My cat eye inks are on top along with some stickles and other tools I use often. This whole project cost me $2, can you believe it?! My husband was really skeptical at first because of it being foam board but it really is quite sturdy and plenty durable for inks. Now that he's seen it all set up he thinks I'm a genius for doing it for $2. LOL

The website that I got the pattern from is http://RebelInker.blogspot.com
She has done a lot of work and put an entire pattern together for it. Be sure to thank her if you download and use her pattern. She rocks!!

And if you try it be sure to let me know. I would love to see it!

Hugz
Tina

Saturday, September 5, 2009

Organizing Cuttlebug Folders Video Episode 7

Here's my quick, cheap, easy way to organize my cuttlebug folders. I forgot to add in the video that I wrote the names on the embossing folder with a sharpie as well.
Hope you enjoy and as always I love to hear your comments.

Friday, June 26, 2009

Scrapbook Room Update Video Tour


Hello everyone! Here's a look at what I've accomplished so far in my new Scrap room. I hope you enjoy and I'd love to hear your comments!
Thanks for stopping by and don't forget to check out the organizing flower video for your chance at the blog candy I'll be giving away Sunday
Tina

Monday, June 22, 2009

Organizing Flowers & Blog Candy

Just a quick video showing how I decided to organize my flowers in my new room and a chance for some blog candy! Be sure to leave a comment with your organizing tips and send all your scrapbook buddies to my blog for a chance to win some blog candy.
 
Thanks for watching and good luck. I will choose a winner Sunday night.

Wednesday, June 10, 2009

The Organizing Begins

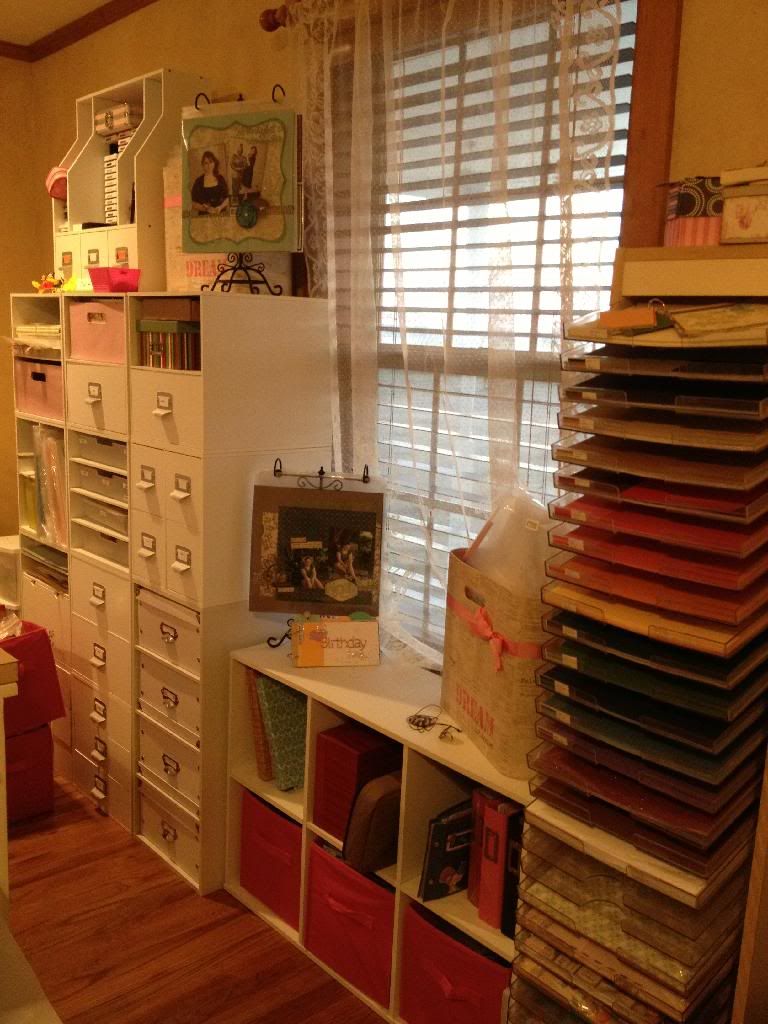
This is the beginning of a lot of organization to come. I found curtains last night but I need to shorten them. I think they're going to be soo cute! Did you notice the pile of paper is gone? This is all my paper. My patterned paper is organized by color family in the wire racks I purchased at Target. Cardstock is in the boxes on top of the shelves. It's sorted by brands right now. I say that very loosely. It need a major rehaul. I like storing my paper in the cropper hoppers so I'll be ordering more of those and transitioning all my paper to that system. On the bottom shelf I have some page kits and 6x6 and 8x8 paper. The top shelf holds my DCWV paper stacks and my 8x11 paper.This is a picture of the space behind my desk. Of course I have a lot more things to fill it up but I'm trying to really not stuff and organize hence the boxes still under the desk. I have my embellishments, ribbon, and bind it all supplies on the left side.

Well that's about as far as I've made it. I have friends coming to scrap this weekend and I'll be teaching them how to use the cricut. We're going to be making some Father's Day cards. I'm going to work one up first so hopefully I'll have a video to upload this week.

Be sure and leave me some comments on my room. I'd love to hear any suggestions for storage.

Sunday, March 1, 2009

Organization

Organization is a place I could really use some help. Since I've moved to my own little space upstairs I've gradually been trying to organize all my stuff so that I'll actually use it up. Novel idea huh? LOL I've turned into more of a collector the last year but that is changing. I found this great article and thought I'd share with everyone in case your struggling like I am.
http://www.cropperhopper.com/organizationaltips.aspx#flat
I actually organized my paper this weekend and hope to conquer my scraps then I'm onto embellishments.
Have a great weekend
Tina

Wednesday, February 25, 2009

Cricut carts and handbook Storage


Hello all. I've been wanting to do this for a while and I finally got it finished. I find myself using the DS so much it was a hassle to get the carts out of the boxes so this is my organizing solution. I wanted to share with everyone but it's taken me forever to get the photos and upload this post.

There's been a post that I saved I believe from the cricut message board using the snapware containers to store your cricut carts and handbooks in. While I was able to buy the shorter containers I was going to have to order the taller ribbon one for the handbook and overlays. Well with shipping I just couldn't bring myself to ever order them. I'm soo glad I never did. I was in Target the other day and found some that work perfectly and they have green handles to match my bug. :o) I believe I spent considerably less money on these as well. $8 to be exact. Yeah! More money for scrapping! They also have several other sizes and styles I want to go back and get to use in my scrap room to organize other items.

I'll explain step by step what I did starting with my handbooks.

Gasp!
Have you ever been annoyed flipping through the handbooks at all the other languages you can't read? Well I have. I have a very wondering brain so I need things simple and straightforward. So hold your breath; I ripped out all those pages. It was very hard in the beginning. I mean I paid good money for these and I'm destroying them. About a third of the way through when I saw how big the stack was becoming it became liberating. I mean look at all the wasted space I'm going to save and not to mention the time flipping to find the English. Pages were flying at this point. Be sure and read further down how I redeemed and recycled part of these pages. I'm still grinning at the cleverness.

The boxes I bought from Target are by Sterilite and the have REorganize Room Essentials on the label. The short one for the carts were $1.99 each and hold 36 carts easily. It's called a Small Clip box. The taller one for the handbooks and overlays were $2.99 and hold a dozen books and overlays with out being tight. You can easily flip through them and remove the books. They're called Medium Clip Box. So far I have 2 mediums to hold all my books and one small one to hold the carts with room to grow. I have 22 carts so far.

I used Fabulous Finds and DS to make dividers the right size to between each handbook and overlay. I hand wrote the titles because I just didn't have the time at home to do it on the computer. I cut them all out on the cricut in no time at all.

Now on to the carts and my cleverness (at least I feel clever). I wanted to label the tops of the carts so I could see the names without having to pull them from the box. I don't have a label maker that would work. I have one that runs the plastic type tape through but I didn't want to use that. I wanted a paper label. I looked over at the pile of throw away pages of the handbook and had a light bulb moment. I cut the name out to adhere on the carts and cut the pictures that showed all the cuts to possibly put on the dividers. Isn't that clever? LOL Very quick! Free! My two favorite things in scrapbooking and life. I just used my tape runner to adhere them to the top. You'll see a couple missing. Two are solution carts that don't come with booklets and 1 is a cart I haven't decided if I want to keep or not.

I then took the cricut head I designed in DS and cut a couple more out of vinyl to decorate the boxes with. I arranged the carts in alphabetical order and then Disney so I labeled the boxes A-O and P-Z and Disney.


I'm thrilled with the set up and the cost. Now if I'm designing with DS and just need the carts I can grab one container and I'm ready to go. If I want to cut from the books I can take all the containers to my table to work.

Hope you can use something I did to incorporate into your organizing and scrapbooking. Have an awesome day!